 |
General Instructions
- Upright and wall brackets must be mounted securely with
appropriate screws and bolts.
- #1,#2 and #3 bells should use a 6x6 post
- Never locate or
install the bell where it may become a hazard.
- Do not modify or
alter the bells and/or parts in any way.
- Replace any damaged
parts with factory parts only.
- The bells should only
be rung using the clapper furnished. When properly installed the clapper will
strike the bell at the correct location. Never use a hammer or any other device
to strike the bell.
- The bell and parts
should be inspected occasionally for loose bolts, balance or damage.
- Proper ringing of the
bell requires a smooth, firm movement; enough for the clapper to strike the
bell squarely for a crisp resonant sound. Do not use a quick jerk motion.
- The C-6 Kid Caller and C-8 Family Bells have an eyelet at
the clapper for use with a short pull cord or lanyard. This makes ringing
easier.
- The Farm style bells
(#1, 2 & 62) each have a crank arm with eyelet for a pull cord or lanyard.
- Mounting - Installation - Assembly
- The C-6 & C-8
style bells may be post or wall mounted. For wood post mounting use minimum ¼”
x 1 ½” wood or lag screw and securely tightened.
- The mounting bracket
must set squarely and firmly on the flat surface of the post. The post must be
firmly and securely imbedded in the ground.
- For wall mounting use
recommended fastener for that particular type wall (concrete, brick, wood). Do
not mount on plaster wall, dry wall or similar without suitable fasteners.
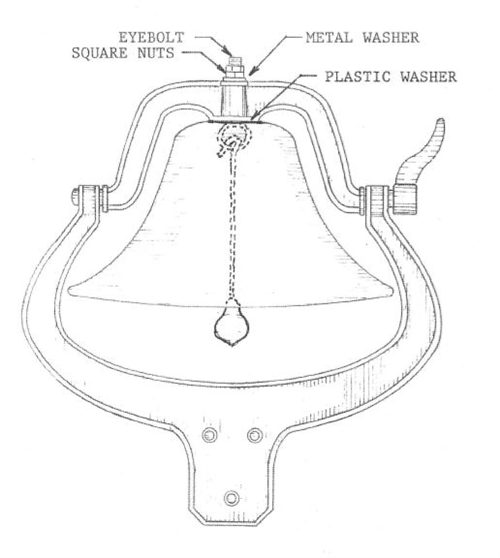
- Assembly - (also see
illustration) The clapper is already attached to the eye-bolt. Align the hole
in the bell with the hole in the wall bracket. Then insert the eye-bolt. The
threaded end will extend through the neck end of wall bracket for the eagle to
be installed. Be certain the eagle is installed firmly and all connections are
tight.
- A small cord or
lanyard may be attached to the eye of the clapper for easier ringing.
- No. 1, No. 2 or No.
62 Farm style bells are for wood post mounting only. The posts must be sized enough
to support the bells and must be firmly and securely embedded in the ground.
- The upright portion
of the bell must be set squarely and firmly against the flat surface of the
post.
- Proper sized bolts
should be used and they must be long enough to pass through the upright and
post. Flat washers and nuts are used to tighten the bolts firmly against the
upright and post. The upright should be vertical and rigid. No movement.
- The No. 1 and No. 2
uprights are drilled for ½” bolts and the No. 62 upright is drilled for 3/8”
bolts.
- Assembly – (also see
illustration) The eye-bolt already has the clapper attached.
- Place the yoke on top
of the bell so the hole in the bell and the yoke are aligned. The bottom center
portion of the yoke is rounded in order to fit into the hollow of the bell
crown (top). Now insert the threaded end of the bolt through both holes and
install the nuts just to finger tight.
- Place the Bell/Yoke
assembly in the Upright. The Bell should hang
squarely, tighten and straighten the Bell
slightly to square it up. Then tighten the nut.
- Note: Be certain the Bell clears the upright in
all directions.
- Now install the Crank
Arm so it is pointing upward at a 45º angle. The mounting hole is tapered so
that the Crank Arm is installed facing outward. Secure the screw, being careful
not to twist off the head.
- Now, re-check all
bolts and nuts.
- Screws and nuts are provided and they must be securely
tightened.
Now ring your bell!
|
|
|